Post by Hurricane on Oct 3, 2013 21:07:09 GMT -5
There's still a few people struggling with anti-aliasing, so I thought I'd create a tutorial of sorts to help out. I hope it helps at least a few people. If you have questions, feel free to ask, or if you are attempting to anti-alias something and you're not sure, post it here and I'm happy to help.
What is Anti-Aliasing?
Anti-aliasing is basically a tool used to make images flow more and blend together rather than look rough and choppy. You do not want to make the image look blurry, you want to make it look smooth.

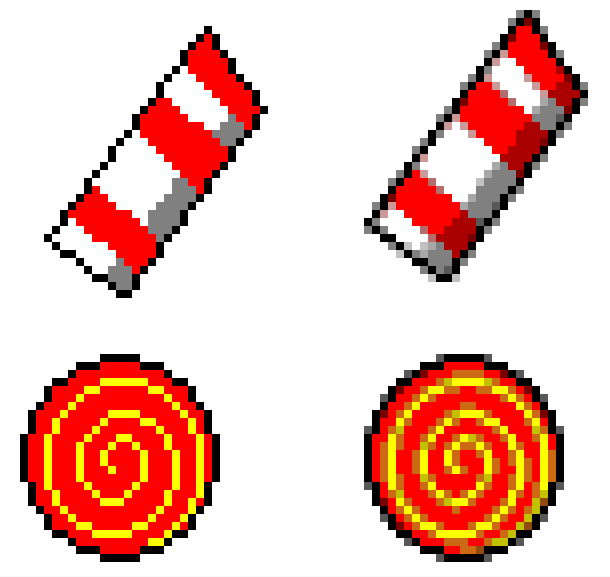
1. In this image, I have created two random shapes with random designs. The first images (left) have no anti-aliasing and the two on the right do. Basically when anti-aliasing black outlines, try to pick a grey similar to the one I used. Remember, you don't want to go overboard, as it will make it look blurry. You just want to smooth the lines a little.
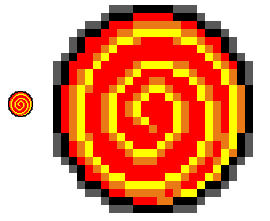
Here's a zoomed in image to see how exactly I did it:
How do I anti-alias two colours together?
If you have clothes with a design on them, such as the image of the candy-cane designed shape I drew, it can be harder to anti-alias. Basically what you want to do is try to get a colour in the middle of the two that are used. In this case, red and white are used. For the anti-aliasing, you want a lighter red/pink colour that is also slightly greyed to fit with the white.
Are there any special tips for anti-aliasing?
When anti-aliasing, DO NOT simple copy the exact line you are smoothing. If you have a black outline, and you draw pixel-for-pixel around it with grey, it will not look smooth and it will not look good. Here is an example of how bad this looks:
As you can see, it looks choppy and rough, rather than smooth as you want. My basic rule for anti-aliasing is -1. You copy the outline but take away one pixel from it when anti-aliasing. This is hard to explain, so it's easier to show.
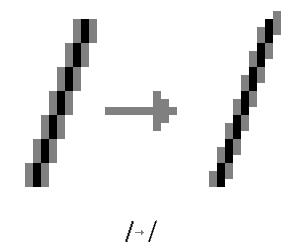
The left image has the outline copied pixel-for-pixel, where the right one follows the -1 rule, taking away one pixel from the anti-aliasing to make it smooth and not rough or blurry. This is not ALWAYS the right way to do it, but most times it works.
What is Anti-Aliasing?
Anti-aliasing is basically a tool used to make images flow more and blend together rather than look rough and choppy. You do not want to make the image look blurry, you want to make it look smooth.
1. In this image, I have created two random shapes with random designs. The first images (left) have no anti-aliasing and the two on the right do. Basically when anti-aliasing black outlines, try to pick a grey similar to the one I used. Remember, you don't want to go overboard, as it will make it look blurry. You just want to smooth the lines a little.
Here's a zoomed in image to see how exactly I did it:
How do I anti-alias two colours together?
If you have clothes with a design on them, such as the image of the candy-cane designed shape I drew, it can be harder to anti-alias. Basically what you want to do is try to get a colour in the middle of the two that are used. In this case, red and white are used. For the anti-aliasing, you want a lighter red/pink colour that is also slightly greyed to fit with the white.
Are there any special tips for anti-aliasing?
When anti-aliasing, DO NOT simple copy the exact line you are smoothing. If you have a black outline, and you draw pixel-for-pixel around it with grey, it will not look smooth and it will not look good. Here is an example of how bad this looks:
As you can see, it looks choppy and rough, rather than smooth as you want. My basic rule for anti-aliasing is -1. You copy the outline but take away one pixel from it when anti-aliasing. This is hard to explain, so it's easier to show.
The left image has the outline copied pixel-for-pixel, where the right one follows the -1 rule, taking away one pixel from the anti-aliasing to make it smooth and not rough or blurry. This is not ALWAYS the right way to do it, but most times it works.